by Deborah Rogers –
So many of my friends have commented this year that their Christmas shopping is going to be different. They’re more concerned than ever about supporting locally owned businesses; they don’t want to deal with lineups and crowds at the big box stores or malls, and if 2020 has taught them anything it’s that we don’t need more stuff in our lives. This all sounds great to me, but despite everything, or maybe because of it, I still want to celebrate Christmas this year, with decorations and gift giving. In this spirit I tried out a new activity this month, to make a gift that’s worthy of hanging in someone’s home.
Erin Young of Young & Barrel Designs spotted a new trend in the home décor world a few years back and has turned it into a flourishing part-time job. She makes wooden signs, often customized, to decorate homes, gardens and workplaces. You will surely have seen them in home décor stores, at craft fairs and in your Instagram feed. A beautiful sign makes a lovely gift, a personalized one even more so. But what about gifting someone the chance to make their own?
Erin started holding workshops just this year, allowing small groups to come to her workspace, or taking her gear and setting up wherever they are. With COVID it has been more difficult, but there are ways to make a class work, within your bubble, and especially if you have an outdoor space to use. So that’s why I had the Seaside team at my house on a sunny afternoon. I cleared a space and Erin brought everything we needed to each create our own sign.
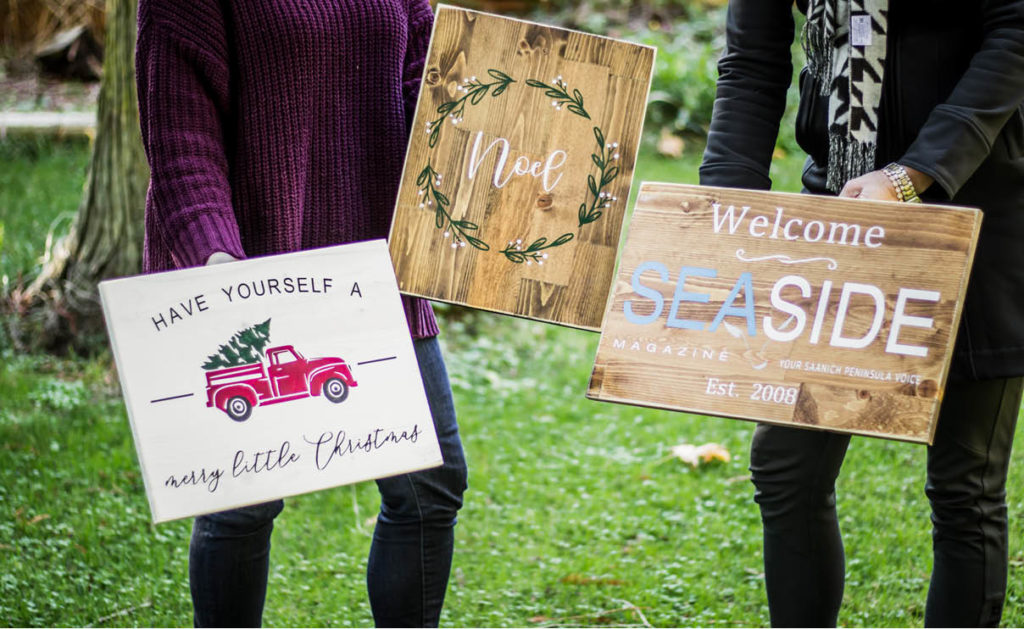
Prior to the workshop each of us had selected a shade of wood stain and Erin showed up with the boards prepped. It’s a laminate pine that she cuts, sands and adds a hanger to, then stain is applied and it’s sanded again. I went for a darker, Jacobean stain, Sue’s sign had a Provincial stain and Amanda opted for a whitewash effect. We had also pre-chosen our designs and Erin cut stencils on her Cricut machine. Really the sky’s the limit in terms of content, but with Christmas decorating and gifts in mind Amanda and I selected festive graphics. Sue’s design was a very representative Seaside logo!
How do you actually make the sign? First of all, you don’t need to be crafty or a skilled painter. It’s a step-by-step process that requires some patience as the stencil is centered on the board using transfer paper, then carefully stripped of all the areas that the paint should be applied through. As with many projects, the key to a professional looking finish is in the preparation, ensuring that things are level and that there are no bubbles or spots that the paint can bleed through.
The painting is done with a sponge, just dabbed through the stencil, and in my case it was very straightforward as I had only two colours – green for a wreath and white for lettering. Amanda’s design was more complicated and required some careful masking off of sections as colour was built up. Erin very gently guided us, correcting problems as they occurred, and demonstrating the calm supportiveness that she must have learned in her day job as an elementary school teacher! The great benefit, besides her creative ideas and patient instruction, is that Erin has worked out all the kinks in the process so each step is completed smoothly, with no chance for mistakes that could spoil the final product.
It was so pleasant to sit together (but separate) and chat as we worked. I could see why it’s an activity that’s become popular with groups of friends. The moment of truth though came as the hairdryer was put aside and the stencil peeled back from the now dry paint.
Ta-dah! I felt thrilled with my elegant Noel sign and could see that Sue and Amanda were equally pleased with their own efforts. Finishing touches can be added at the end – for me that meant some white berries on the mistletoe – before Erin sprayed a final lacquer on the signs to set them.
Now I have a lovely addition to my holiday décor, and I have the lovely memories of the time spent with the team creating it. It’s a two-in-one gift – perfect to give to someone you love, or maybe to yourself!
Photos by Amanda Cribdon Photography


