by Janice Henshaw | photos by Janis Jean Photography except where noted –
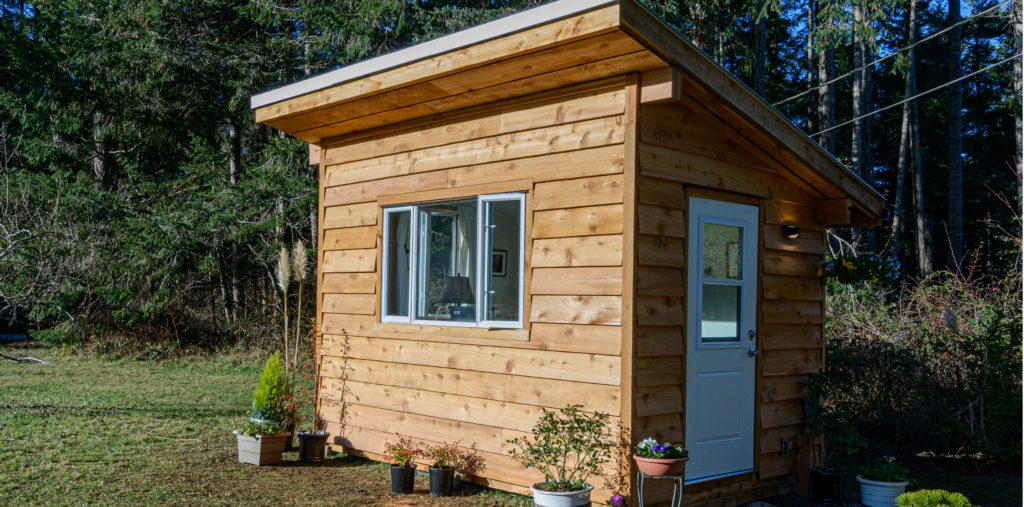
I wrote a story for the March 2019 issue of Seaside Magazine titled: “I Want a She Shed! A What? A She Shed!” In the article, I asked: “So where do you go when you need a slice of rejuvenating peace? Your very own She Shed – that’s where you go.” To be clear about what a She Shed is, I defined it as “a warm and cozy, one-room shed” located conveniently in your backyard.
Just as going shopping creates compelling “wants” that weren’t there before, researching and writing about She Sheds caused me to dream about having one of my own, which transformed over the summer of 2020 into something that I “had to have.” First, I looked at sheds for sale, but they were made with cheap materials, had no insulation and were expensive! So, I decided to build my own. Surely, I could do it even cheaper, for $2,000 or $3,000 – if I did all the work myself?
Starting in October, I took the first exciting steps: choosing a location not too far from the house, not too close, with great orientation to capture winter sunlight, and away from overhanging tree branches. With my friend Carolyn (at a safe distance), I scraped the ground and measured out how big the building should be – but, in reality, how small the building would have to be: under 100 square feet to avoid the need for a building permit and all that that entailed.
In my early 20s, I worked in construction as a “gopher” for a few months, but I didn’t know any of the “whys.” Here I was in charge of my own little building, and I didn’t know the little decisions that would add up to success down the road. I started by watching enough YouTube videos to get thoroughly confused! So many different opinions out there! I also did the old-fashioned thing and asked local tradespeople for their advice. One carpenter told me there was no need to insulate the floor in such a small building. Thinking he knew best, I screwed the plywood down, thought about it, and then, the very next day, pulled it all up again and insulated it. Who wants cold feet? Too much information; too many opinions – I realized it was time to figure things out on my own, one step at a time.
Some things went well, and others not so good. For example: I planned the joists and wall studs to be 16 inches on centre, but because various things got in the way, such as the cement blocks and metal joist hangers, some had different widths. What could that matter? I found out the answer when I added the fibreglass insulation batts designed to fit into 15 inches. In the ceiling, the insulation batts fell out of the-too big spaces, landing in my face, and if you have ever worked with insulation, you know how uncomfortable that can be! Also, screwing on the drywall is a lot easier if the studs are evenly spaced.
Friends came to help dig the 100-foot long, 18-inch deep trench for the direct burial wire that would bring electricity to my shed; there were four of us with shovels and picks and, after a few hours, aching backs. Many weeks later, other friends arrived in a drizzle with hammers and boots and ideas on applying siding. We cut boards too short or a wee bit too long and squashed nails that made happy face depressions in the beautiful wood when our hammers slipped. Who cares? We had fun!
The two- by 10-inch roof beams were heavy; at 12 feet long, they were made of planks nailed together. To raise them, my friend Sandra and I set up tall ladders and lifted the beams one rung at a time up to the top of our ladders. When it came to the final lift, we just had to pick it up and hope we made it. We did, and it was a big thrill to see both beams safely in place. Another big lift involved the windows, which were a great score. I had noticed them leaning against some cedar trees just down the road. I checked them out and bought three huge opening windows with screens for $90! Making deals – that’s part of the fun! The largest six-foot window felt like it weighed a ton, and it left large blue bruises on our thighs where we momentarily rested the metal frame before taking a big breath and heaving it into place. I prayed that the windows would fit in the rough openings, and they did … more or less.
Initially, I thought I could build the shed in a week or two at the most. I couldn’t have been more wrong. Workdays stretched into 10 to 12 hours; however, I didn’t care as I loved the work. Sure, there were frustrating times, like when the flooring I bought from a charity store wouldn’t “click” into place properly after I struggled with it on my hands and knees for two days. I ended up taking the whole floor apart, including the still sticky glued-down entry tiles, and started over with better material.
But the good moments were much better than the tough ones as I moved from framing to drywall to finishing. I created a pine fold-down desk to take up less space in the room, trimmed the windows in beautiful local fir, added moulding to the floor, painted, hemmed curtains and built shelves. It all required learning and patience, care and precision … and just the right touch of nervousness for safety. Banged-up thumbs from hammers, wood slivers, puncture wounds and backaches are fading away now, replaced by the sheer delight in having my own She Shed.
The shed’s cost was higher than I estimated, adding up to just over $7,000, but in terms of having a project, it was one of the best! In my March Seaside article, I had added this quote from My Fair Lady: “All I want is a room somewhere, Far away from the cold night air, With one enormous chair; Oh, wouldn’t it be loverly?”
Well, I am delighted to say that I have my “loverly” room now, and I bought the chair!